Turning drone video into a measurable 3D model comes down to one thing you control in the field: how you fly. Get the flight pattern right and SkyeBrowse Universal Upload turns your video into a georeferenced 3D model in minutes, from any drone (DJI, Autel, Skydio, Parrot) or any camera that records MP4 or MOV. This tutorial puts the manual flight paths first, so you can fly it correctly on the first try.
Video tutorial
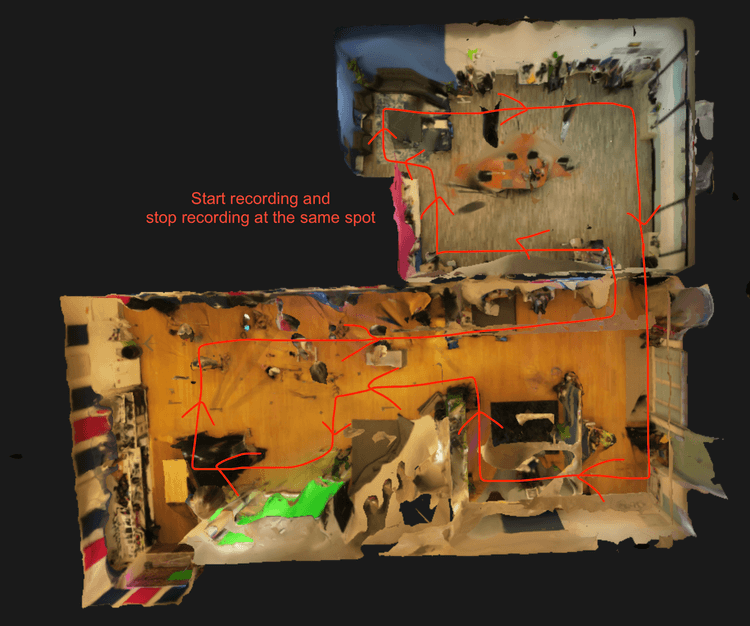
How do you fly a manual drone flight for a 3D model? For a small scene, fly one smooth orbit around the subject with the camera angled about 45 degrees down, keeping the subject centered. For a large area, fly a back-and-forth grid pointed nearly straight down, then orbit any structures that need detail. Lock your zoom, move slowly, finish where you started so the footage overlaps, and enable subtitle (SRT) recording for automatic georeferencing. Upload the video to SkyeBrowse Universal Upload and the model is ready in minutes.
The manual flight, in 90 seconds
There are only three moves to learn, and you pick based on the size of your scene:
- Orbit a small, focused subject (a vehicle, a piece of evidence, a single structure under about 1 acre).
- Grid a large area by flying back and forth like mowing a lawn.
- Combine both for the highest detail: grid the whole site, then orbit the structures that matter.
Angle is everything. Use this ladder depending on what you need to capture:
That is the whole method. The rest of this tutorial is detail on each pattern and the handful of capture habits that decide whether a model comes out clean.
Flight pattern 1: the orbit
The orbit is the core pattern for small, focused subjects: a single vehicle, a piece of evidence, a small outdoor scene under about 1 acre.
Angle the camera about 45 degrees down toward your subject, then fly a steady circle around it with the subject centered in the frame. Let it fill roughly 50 percent of the viewfinder for a good balance of detail and surrounding context. Keep exterior orbits around 5 to 10 mph and slow down as you fly lower and closer. Move smoothly. Camera shake produces a blurry model, and capturing the sky or horizon reduces quality.
The single biggest mistake is standing still and panning the camera. Walk or fly a full circle around the subject instead. Panning in place gives the algorithm no depth to work with.
For a taller or multi-level subject, add a second, lower orbit with the gimbal pitched to about 30 degrees to fill in vertical faces and overhangs. This is optional and only worth it for larger or more complex structures.
Flight pattern 2: the grid
The grid is for mapping large areas (over about 1 acre) quickly. Instead of circling one object, you fly back and forth in straight lines across the area, like mowing a lawn, with the gimbal pointed nearly straight down (around 90 degrees) to capture roofs and flat ground. Keep grid speed around 15 to 20 mph.
For extra detail in structured scenes, fly a second grid perpendicular to the first, a crosshatch. A grid on its own produces a solid overhead map, so if you only need a fast 2D or 3D snapshot of a wide scene, a grid by itself is enough.
Combine grid and orbit for the best model
For the highest quality on a large site, fly the grid for the area, then orbit the structures that need detail. The grid fills in the tops and the broader ground, and the orbits capture the sides and angles. You can mix both in a single capture, or fly them as separate recordings and upload the files together. Premium accounts accept up to 3 videos per model and Premium Advanced accepts up to 10.
Capture rules that make or break the model
These are the habits that separate a clean model from a fragmented one. They apply in the air and on foot.
- Move around the subject, do not pan in place. A full circle gives the algorithm depth.
- Lock your zoom. Set it once and leave it. Zooming mid-video changes the lens and breaks the reconstruction.
- Capture from several angles. One pass at 45 degrees, a lower 30-degree pass for vertical faces, and a top-down grid for roofs and flat ground.
- Keep motion smooth and steady. About 1 mph indoors, 5 to 10 mph for exterior orbits, 15 to 20 mph for grids.
- Angle the camera down at the subject. Avoid filling the frame with sky or ceiling.
- Overlap your footage. Go all the way around and finish where you started.
- Use even lighting and avoid hard surfaces for reconstruction. Glass, water, mirrors, and blank walls give the algorithm nothing to match.
- Filming on a phone? Record at 60 FPS for smoother, sharper frames.
Before you fly: camera settings
Two settings to get right before takeoff. First, enable video captions (subtitle recording) on your drone. On DJI drones this is in the top-right settings menu. It records an SRT file alongside your video containing GPS logs, which SkyeBrowse uses to automatically georeference your model so measurements are accurate out of the box. Autel drones produce an .ASS file that does the same.
For quality, shoot a minimum of 1080p, ideally at 60 fps for fine detail. Higher resolutions produce more detailed models at the cost of larger files and longer processing.
See it in action
If you have a compatible DJI or Autel drone and want a one-button-press capture instead of flying manually, see the Flight App Tutorial. You can also explore our case studies to see SkyeBrowse in real-world scenarios.
Uploading and processing
Once your flights are complete, pull the SD card and head to app.skyebrowse.com.
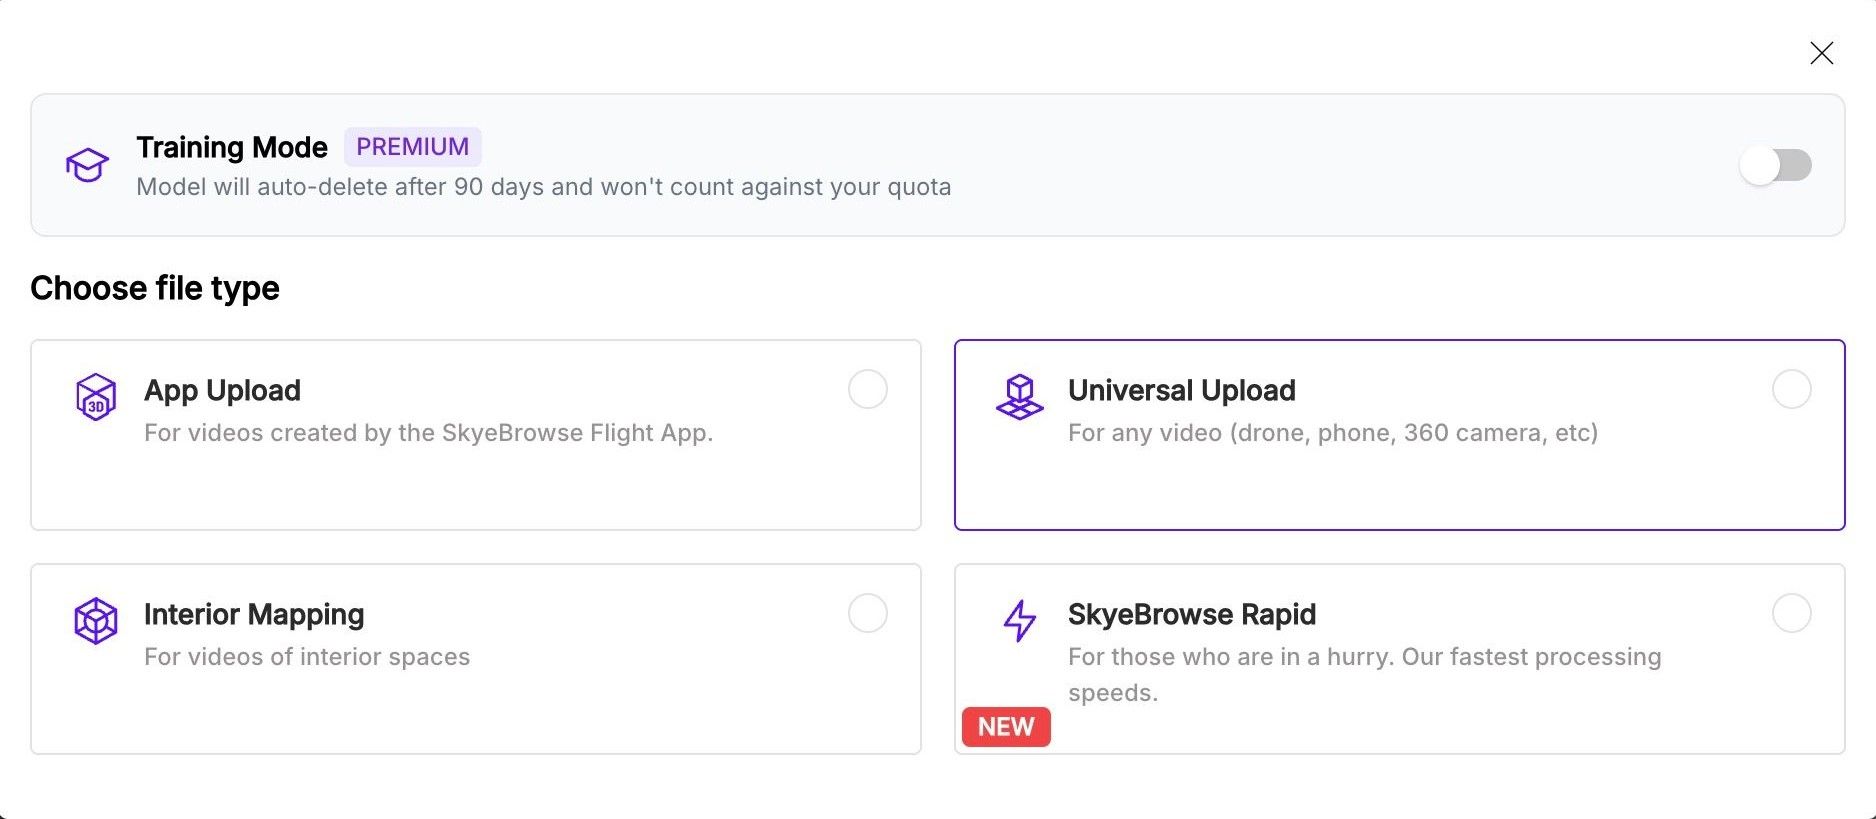
1. Initiate upload. Click "Upload" and select Universal Upload.
2. Name your model. Enter a recognizable name.
3. Select video files. Click "Browse" and select your video (.MP4 or .MOV). If you enabled video captions, click "Browse" again and add the SRT (or .ASS) file to attach GPS logs and automatically georeference your model.
4. Multi-video upload. If your drone split the recording, or you flew the orbit and grid as separate videos, upload them together. Premium supports up to 3 videos, Premium Advanced up to 10. Keep the files in capture order.
5. Upload and process. Click upload. Processing runs at roughly one minute per minute of video. You will get an email when the model is ready, and you can refresh the page to track progress.
6. Review your model. View your 3D model, 2D map, and sketch drawing directly in SkyeBrowse.
Frequently asked questions
Can you make a 3D model from any drone's video?
Yes. Any drone that records at least 1080p MP4 or MOV can produce a 3D model through Universal Upload, including the full DJI line (Mini, Air, Mavic, Inspire, Matrice), Autel (EVO II, EVO Max 4T), Skydio, and Parrot. Universal Upload only needs the video file, plus the SRT or .ASS subtitle file if your drone produced one. You can also use non-drone video: a phone walkaround, a GoPro, a body-worn camera, or a 360 camera. The same flight advice applies on foot.
Can you make a 3D model from drone video without a flight app?
Yes. Universal Upload is built for manual flights. Record an orbit, a grid, or both using the drone's native camera, pull the SD card, and upload. No automated mission planner or third-party flight software is required.
Do you need an SRT file to make a 3D model?
No, it is optional. Without it, Universal Upload still builds the model from video frames, but the model is not georeferenced and measurements need a manual scaling step against a known reference. With the SRT or .ASS file, GPS logs scale the model automatically and measurements are accurate out of the box.
How much video do you need?
For a single orbit, 60 to 90 seconds of slow, steady recording is usually enough. For a grid over a large area, plan one to three minutes per acre depending on altitude.
How long does it take to convert drone video to a 3D model?
Processing is roughly one minute per minute of video. A 10-minute capture becomes a model in about 10 minutes. Larger multi-video captures and higher resolutions (4K, 8K) take longer. Most field captures are ready for review before the operator finishes the drive back to the office.
Can SkyeBrowse turn old drone footage into a 3D model?
Yes, as long as the recording meets the basics: 1080p or higher MP4 or MOV, steady motion, the subject framed and not dominated by sky. Archived footage from any drone and any year works. Georeferencing is automatic only when an SRT or .ASS file is uploaded with it.
Conclusion
Universal Upload turns any drone, phone, GoPro, or 360 camera into a measurable 3D model. The flying is the part you control: angle the camera down, move slowly, lock your zoom, and choose the pattern that fits your scene. An orbit for small subjects, a grid for wide areas, or both for maximum detail.
If you haven't already, make a free account with SkyeBrowse and create your first 3D model today.